


A home espresso station with grinder layout fails when the machine “fits” the counter but mornings still scramble: hopper blocked by a wall, tank behind a toaster, knock box on the wrong side of the portafilter, steam wand that cannot swing without moving cups.
This Meraki setup guide owns physical layout for a single-unit (integrated-grinder) station: zones, handedness, cable path, water refill, knock-box landing, and steamer reach — plus when a multi-appliance triangle still makes more sense. Soft-link home espresso station ideas for small spaces for the small-space idea gallery; cable management for a safer counter when cords alone are the risk; water spill protection for liquid vs cabinets; station lighting for seeing puck and milk; home espresso setup and space for a broader space overview; and compact setups for small kitchens for a compact-machine shopping list. Soft-name a family milk all-in-one buy filter (A048), an integrated vs separate space/cost card (A020), and a steam-cabinet clearance checklist (A028) when those lanes own the next click.

One chassis with grinder, brew, and steam changes the layout job: place zones around the machine — do not copy a café triangle that assumes a separate grinder.
What “home espresso station with grinder layout” really means for home buyers
Home espresso station with grinder layout, for kitchen organizers, means how you place a single-unit espresso system (or a machine-plus-separate-grinder station) so grind → dose → brew → knock → steam flows without crossing cords or blocking refill — not a Pinterest collage of trays and syrups.
SERP for this phrase is noisy: décor galleries, furniture threads, café-bar posts, and shopping cards for “espresso with grinder.” Useful organizers already want a station. What they still lack is a zone map for a with-grinder single unit: knock-box side, tank/hopper clearance to a wall, pitcher landing for steamer reach, and how that differs from a multi-appliance pad that often needs about 36–48 inches of linear space for machine and grinder.
Treat three layers. Station type: single-unit vs multi-appliance. Hand flow: dominant hand for lock-in, knock, and steam. Placement order (this page): outlet and cable first, chassis second, soft tools third, then a dry-run of the morning path. Soft-link the small-space layouts gallery when inspiration photos are next; stay here for physical layout with a grinder on the same chassis.
Who this page is for (and who should skip it)
This page is for kitchen organizers placing a home café pad around a machine that already includes (or will include) a grinder on one chassis — people who care about left/right flow, refill access, knock-box landing, and steamer reach more than décor mood boards.
Skip small-space station ideas for the idea gallery; cable management when the only open risk is cords; spill protection for liquid water vs cabinets; station lighting when puck visibility is the blocker; setup and space for a general space overview; and eight compact setups when you still need a compact shopping list. Soft-name family milk all-in-one buying when the question is whether one grinder + steamer pad fits household milk drinks; soft-name integrated vs separate space/cost when sprawl and upgrade math — not zone order — is the debate; soft-name steam-cabinet clearance when vapor under paint — not tool landing — is the fear. Come here for: physical layout for a with-grinder single-unit station.
Why physical layout beats a prettier counter photo
This article is published by Meraki. The unique job is physical layout: map zones and placement order for a single-unit espresso station with integrated grinder — handedness, cable, water refill, knock box, steamer reach — versus the wider multi-appliance triangle.
That is not a small-space idea gallery, not a cable-only safety post, not spill waterproofing, not a lighting guide, and not a compact-machine shopping list. Soft-link those live Meraki posts when their lane owns the next click; keep this page for zones that survive a weekday morning.
Disclosure: Meraki sells the Meraki Espresso Machine — dual boilers, rotary pump framed near steady 9 bar, professional steam wand, built-in dual scales (±0.2 g), TIMEMORE® co-developed burr grinder, guided touchscreen. Live framing (2026-10-26/27): heat-up about 3–4 minutes; brew and steam together; chassis about 370 × 370 × 415 mm (~14.6 × 14.6 × 16.3 in), ~14.5 kg (~32 lb) — re-check the product page. No invented German Design / Red Dot claims. An all-in-one chassis shrinks the pad versus machine + separate grinder; it does not erase the need for knock-box, pitcher, and refill clearance around that one box.
Tools and measurements to prepare first
Layout fails when you only clear a photogenic empty stretch of island. Prepare tools that prove reach and refill — not tools that dial taste.
Have a tape measure, painter’s tape, notes, your dominant-hand preference (portafilter lock-in side), and soft tools you already own: knock box, pitcher, cups, dosing cup if you use one. Optional: a cardboard mock-up of chassis W × D × H before you lift a heavy machine. Soft-link cable management once the outlet is chosen; soft-link spill protection if the pad sits above porous wood — those pages own cords and liquid; this prep only marks where tools land.
Record five numbers: (1) free width and usable depth; (2) clear height to any overhead cabinet; (3) wall clearance on the hopper/tank side; (4) lateral space on the steam-wand side; (5) path from sink or jug to the tank without crossing the brew zone mid-shot. Meraki’s published footprint is one chassis example — your zone map sits around that box. Soft-name steam-cabinet clearance if overhead vapor — not tool order — is still open.
Step-by-step: place a single-unit station that actually flows
You do not need a café architect. You need a placement order that survives “compact” brochure claims. Run it once with tape, then once with the machine before daily milk drinks begin.
Step workflow — physical layout for a with-grinder single unit
- Pick the outlet and cable exit first. Choose a receptacle that lets the cord leave the rear or side without looping across the knock or steam zone. Soft-link cable management for strain relief and kid-safety detail; do not park the chassis until the cord path is honest.
- Tape the chassis pad. Outline published W × D. Leave a soft rectangle in front for portafilter work and cups so soft sprawl does not shove the wand under a cabinet. Soft-name integrated vs separate space/cost if you are still comparing a one-box pad to a machine + separate grinder triangle.
- Assign the dominant-hand brew arc. Lock the portafilter on the side that matches how you naturally twist. Keep the scale/dosing cue (or built-in scale view) in the same visual cone — Meraki’s guided touchscreen and dual scales live on the chassis, which shortens the “walk to another grinder” step that multi-appliance stations need.
- Park the knock box on the empty-portafilter exit path. After a shot, the puck should travel a short arc to the box — not across the pitcher or open tank. Prefer the side opposite milk so crumbs stay out of the pitcher.
- Map water refill and hopper access. Confirm you can fill the tank and open the hopper without sliding the machine every morning. A wall an inch from the tank side is a common silent fail. Soft-link spill protection for refill drips.
- Prove steamer reach with a real pitcher. Swing the wand and tilt at your normal height. Soft-name steam-cabinet clearance if vapor hugs painted undersides; soft-link station lighting if you cannot see microfoam there.
- Dry-run once. Grind → lock → brew → knock → steam → wipe without moving furniture. If you cross yourself twice, swap knock and pitcher sides before buying more trays.
- Lock the pad. Mark tape corners or photograph them. Stop daily rearranging unless a measurement fails.
Café layout literacy still starts with minimal movement — short paths from grind to brew to milk, not copying a commercial rail into a galley kitchen. CoffeeGeek guides repeatedly push visualize-before-you-buy over décor-first pads. Soft-link small-space ideas when you want photo inspiration after the zones work.
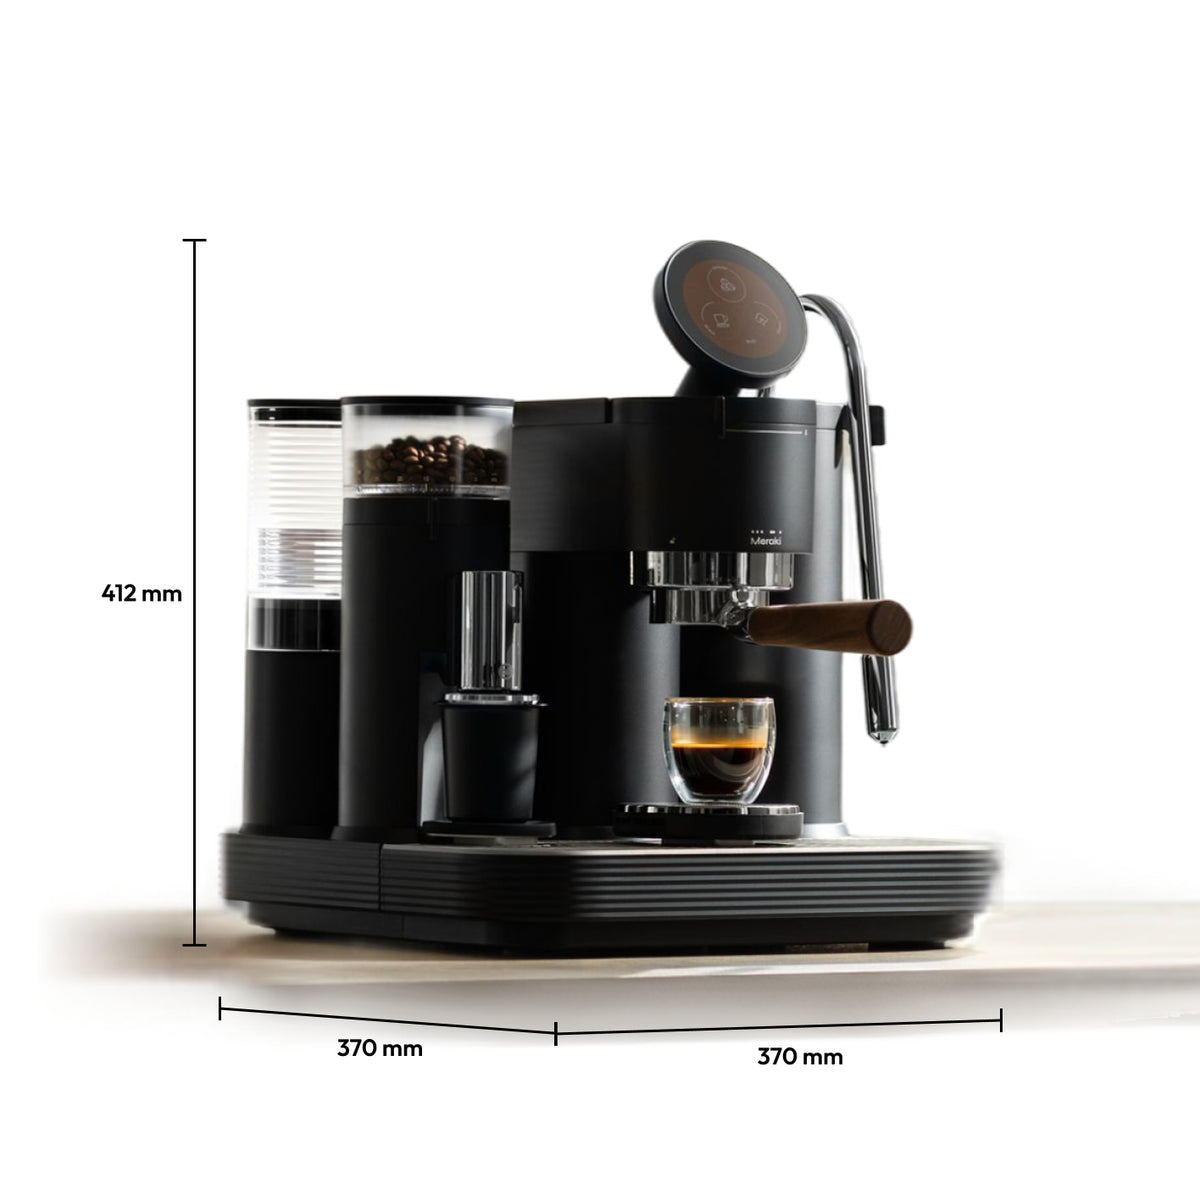
Chassis W × D × H is layer one. Add knock-box, pitcher swing, tank/hopper clearance, and cable exit before you call the home espresso station with grinder layout “done.”
Zone targets that keep you out of rabbit holes
Exact inches vary by maker, wand side, and kitchen depth. Treat the table as planning defaults for organizers, then confirm against your machine’s manual and a dry-run. They are not a building code or a substitute for Meraki’s live product specs.
| Zone | Single-unit (integrated grinder) default | Multi-appliance contrast |
|---|---|---|
| Chassis pad | Published W × D × H + front soft landing for cups/portafilter | Same chassis plus a second pad for the grinder |
| Hand / brew arc | Dominant-hand lock-in; tools in one visual cone | Grind on one appliance, walk to group head |
| Knock box | Short arc off the empty portafilter; away from pitcher | Same rule — often squeezed between two appliances |
| Water / hopper refill | Clear wall-side access without sliding the machine daily | Tank access plus separate hopper on the grinder |
| Steam / pitcher | Lateral tilt space on wand side; tip not into a wall | Same wand rule; pad often wider overall |
| Cable / outlet | Cord exits behind or aside — never across knock/steam | Two cords; soft-link cable management |
| Linear counter (rule of thumb) | Often fits a shorter run than machine + grinder | Many planners cite ~36–48 in for both boxes + tools |
Meraki’s published footprint (~14.6 × 14.6 × 16.3 in) is one example of a single-unit pad. Soft-name family milk all-in-one buying when the next question is whether that one pad covers weekday lattes; soft-name integrated vs separate space/cost when upgrade path and sprawl — not zone order — decide the purchase. Category habits from the Specialty Coffee Association and CoffeeGeek guides still assume a station you can repeat; NIST is a reminder to re-measure after you move the pad, not only once from a brochure.
Common mistakes and quick fixes
Most “layout” failures are photo layouts. Fix the path before you buy another organizer bin.
Mistake: Copying a café triangle that assumes a separate grinder. Fix: Place zones around one chassis first; only widen the pad if you choose multi-appliance. Soft-name integrated vs separate space/cost.
Mistake: Knock box on the steam side. Fix: Swap so puck dump and milk never share the same landing.
Mistake: Tank or hopper against a wall with no pull-out clearance. Fix: Shift the chassis a few inches or flip which side faces the wall so refill is a daily habit, not a weekly fight.
Mistake: Decorating first (syrups, art, trays) before proving the brew arc. Fix: Soft-link small-space ideas for inspiration after step 7 passes.
Mistake: Solving vapor under cabinets with more trays. Fix: Soft-name steam-cabinet clearance — that is geometry and purge direction, not layout décor.
Mistake: Ignoring cords until a foot catches them mid-steam. Fix: Soft-link cable management; UL and CPSC still apply on a busy counter.
Mistake: Buying “compact” from a shopping list without a zone map. Fix: Soft-link eight compact setups for SKU ideas, then return here to place the winner.
A one-week layout tune-up (not a taste dial-in)
Taste dial-in is a different job. This week judges whether the station path is honest — not whether your ratio is perfect.
After each morning drink for seven days, note only layout friction: machine slid for refill, knock box blocking pitcher, wand forcing cups aside, cord across the wrist. Change one zone per day max. Soft-link station lighting if you cannot see puck or milk in the locked pad; soft-link spill protection if refill drips are the recurring mess. Soft-name a weekday morning routine when the clock — not the zone map — breaks after layout is stable.
NCA brewing basics and About Coffee brewing help once the station stops fighting you; Barista Magazine still treats workflow as a skill — at home it starts with where the box sits.
When to stop rearranging and just drink
Stop rearranging when refill, knock, and steam each have a fixed landing, the cord never crosses the brew arc, you can make one normal drink without sliding the chassis, and soft tools do not steal pitcher space. Further shuffling is usually décor itch, not new layout data.
If the only “fix” left is a separate grinder for upgrade reasons, soft-name integrated vs separate space/cost once — then decide. Soft-name family milk all-in-one buying if household milk-drink fit is still unclear; soft-name steam-cabinet clearance if vapor marks cabinets; soft-link small-space layouts if you only wanted photo ideas. When physical layout for the with-grinder single-unit station is done, brew.
Compare Meraki’s live footprint and guided workflow on the Meraki Espresso Machine product page when a single-unit pad is the goal — then prove zones on your counter. Soft-link setup and space for a wider overview after this map is locked. energy.gov covers home energy context; heat still concentrates if you bury the chassis in a cubby — layout and clearance both matter.
FAQ
How much counter space do I need for a home espresso station with a grinder?
A single-unit machine with an integrated grinder often needs the chassis footprint plus front soft landing for cups and a knock box — shorter than many machine-plus-separate-grinder pads that planners estimate around 36–48 inches of linear space. Tape your published W × D, add pitcher swing and refill clearance, then dry-run once. Soft-link Meraki’s small-space layouts gallery for inspiration after the zones work; use this page for placement order.
Should the knock box sit on the left or the right?
Put it on the short arc off your empty portafilter after the shot, preferably opposite the steam pitcher so puck dump and milk never share a landing. Match your dominant-hand lock-in first, then place the box where the used portafilter naturally exits. Swap sides during a one-week layout tune-up if you keep crossing yourself.
Is a single-unit station always better than machine plus separate grinder?
No. Single-unit wins on shorter pad and fewer cords when the built-in grinder meets your needs. Multi-appliance wins when you want a separate grinder upgrade path or a dedicated grind zone. Soft-name Meraki’s integrated-vs-separate space/cost discussion when sprawl and ownership math — not zone order — decide the buy.
Where should the water tank face in a tight kitchen?
Face the tank (and hopper lid) toward open reach — not a wall that forces you to slide the machine for every refill. Leave a clear path from sink or jug to the tank that does not cross mid-brew. Soft-link Meraki’s spill-protection guide for drips during refill; keep this FAQ for access geometry.
What Meraki dimensions should I use when taping the pad?
As checked around 2026-10-26/27, Meraki lists about 370 × 370 × 415 mm (about 14.6 × 14.6 × 16.3 in) and about 14.5 kg (about 32 lb) on the product page — verify live before you buy. Those numbers are chassis only; add knock-box, pitcher swing, cable exit, and refill clearance for a real home espresso station with grinder layout.


